


Mr. Scott MacPhee has kindly put together this page detailing step by step how he made the Brunswick Leib Batallion head conversions. Many thanks to Mr. MacPhee.
The Brunswick contingent of Wellington's Anglo-Allied Army at Waterloo
was a small, yet colorful force. With their all-black uniforms and
skull and crossbone crest, one observer likened them to "an immense moving
hearse." The "Black Band" had a Leib battalion, Avante Garde battalion,
3 line battalions, 3 light battalions, a regiment of hussars, a squadron
of uhlans, a battery of horse artillery, and a battery of foot artillery.
The HäT Leib Battalion set has all the figures dressed in the characteristic
Brunswick dolman with braided front. Each infantry battalion in the
Waterloo campaign had a strength of 672 men. Facing colors for the
infantry were as follows:
|
|
|
|
| Gelernte Jäger, Avante Garde | ||
| Light Companies, Avante Garde | ||
| Leib Battalion | ||
| 1st Line Battalion | ||
| 2nd Line Battalion | ||
| 3rd Line Battalion | ||
| 1st Light Battalion | ||
| 2nd Light Battalion | ||
| 3rd Light Battalion |
When HäT Industrie issued their Avante Garde set, the Brunswickers were available in plastic for the first time. The Avante Garde Battalion consisted of four companies. Two were Gelernte Jäger and two were light infantry. The HäT figures have a plain, unbraided jacket, making all their figures Gelernte Jägeren. The light infantry companies in the Avante Garde wore the same hat as the Gelernte Jägeren, but also wore the Brunswick dolman with braided front.
The line and light battalions all wore the bell shako with a small plume on top. The plume was colored light blue over yellow for the line battalions, and yellow over light blue for the light battalions. The shako plate was silver, and depicted a running horse for the line battalions and a bugle for the light battalions. The small silver disc above the plate bore the battalion's number. The Leib Battalion wore a bell shako with white death's head emblem and black horsehair plume. All Brunswick men had silver buttons on their uniforms.
Only the line battalions carried flags at Waterloo. The figure loading his musket makes an excellent colorbearer - all that is required is to remove the musket and replace it with a length of piaon wire.
Now, with the new Leib infantry set, most of the Brunswick contingent can be fielded by wargamers and modellers. I will take you through the steps involved in changing two of HäT's Leib Battallion men into men of the line battalions and avante garde battalion light companies. The conversion for light battalion men is exactly the same as that we do here for the line battalions.
Step I: Materials
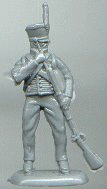
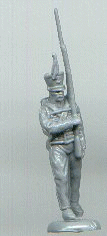
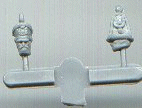
Here are the figures, detached from the sprue, and the heads I will be using for the conversion. I will also be using the very smallest-guage piano wire from the local hobby shop, a hobby knife, a pair of needle-nose pliers, and a wire cutter.
Step II: Prepping the Figures
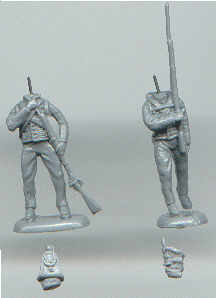
There is some noticeable flash on this fugures which must be removed with the hobby knife. The heads must be carefully removed from the body, just where the flesh meets the collar. Be cautious! I gave myself a nasty cut on my left index finger during this process. When the flash has been trimmed and the heads are removed from the sprue, wash the figures in hot water and dishwashing soap to remove the greasy residue left on them after manufacturing. Gently push a length of piano wire into the neck of the prepped figures, then cut it off. Do not leave the protruding wire too long, or it will poke through the head of the converted figure.
Step III: Attaching the Heads
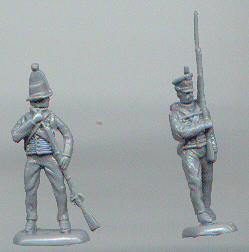
This can be tricky, as the heads must be well aligned with the neck and shoulders. Carefully press the head onto the piano wire until it is flush with the collar. A small groove can still be seen between the head and the neck.
Step IV: Mounting and Basecoating
My local Michaels store sells 6" wooden rulers for $.29 apiece. I buy these by the box, as they have two uses. They provide an excellent surface for mounting figures for painting, and they are easily cut into 1.5" strips for wargaming bases. They are a little thicker than most bases, but I find that this works well for the more fragile plastic figures: if you handle them by the thick base, they won't shed as much paint. The Michaels store also sells artists' acrylics in little 2 ounce tubes for between $.49 and $1.19, and I use these almost exclusively as my hobby paints; they are cheap, give a good, flat finish, dry to a thin, flexible coat, and don't dry out in the can as as hobby acrylics often do. For most figures I start with a black basecoat in order to have more subdued color scheme and to emphasize raised detail and shadow. Many figure painters will add a white drybrush coat in order to bring out raised folds in clothing, but this is one technique (of many) I have not yet mastered. The black acrylic paint will seep into the groove between head and body, both filling the unsightly seam and cementing the two together.
Step V: Painting
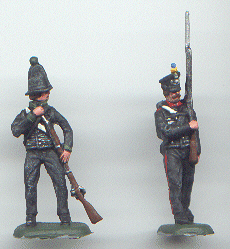
Here are the completed Brunswick figures. The facial details on these figures are quite good, making them easy to paint. The black uniforms benefit, in my judgement, from a slight light grey drybrush, with a little white drybrush over the braided dolman thrown in for good measure. The figures here depict privates of the 1st Line Battalion and light company of the Avante Garde battalion.
That is my technique for head-swapping conversions. In some cases
just the headgear may be swapped, but this is actually more difficult with
most figures. Many thanks to HäT Industrie for including extra
heads in their sets. I would welcome any comments on these or other figures,
and can be reached at smacphee@msn.com